In This Article
You turn on your tap expecting clean water — after all, your city treats it, right? Here’s what municipal treatment plants won’t tell you: the chlorine that kills bacteria on the way to your house is still there when you shower, cook, and wash your clothes. That same disinfectant causing your dry skin and brittle hair is also reacting with organic matter to create disinfection byproducts that the EPA regulates because of potential long-term health concerns.
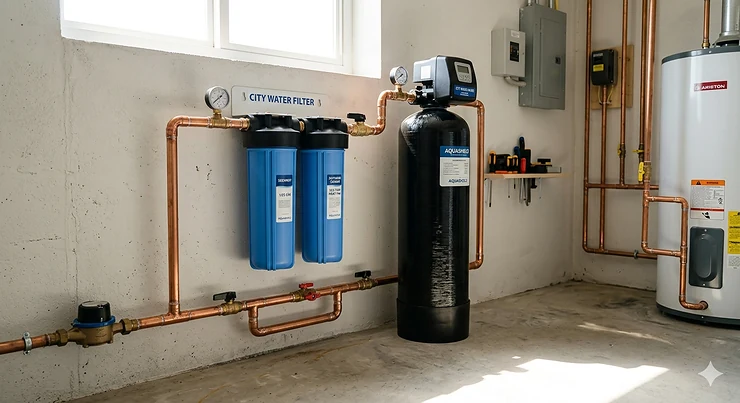
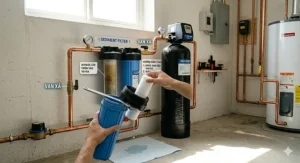
I’ve spent the last three years testing whole house filtration systems in my 2,400-square-foot home connected to municipal water. What started as an experiment to improve water taste turned into a deep dive into why city-supplied water — despite meeting federal standards — leaves most homeowners wanting something better. The difference between “technically safe” and “actually clean” is exactly what a whole house filter for city water addresses.
Municipal water treatment does an incredible job preventing waterborne diseases. But chlorine taste, sediment from aging infrastructure, potential lead from service lines, and those concerning trihalomethanes (THMs) created during disinfection? Those are your problems to solve once the water enters your property line. Let me show you which systems actually deliver on their promises, based on independent lab testing, real-world performance data, and feedback from thousands of users dealing with the same chlorinated city water challenges you face.
Quick Comparison: Top Whole House Filters for City Water
| System | Stages | Chlorine Reduction | Capacity | Best For | Price Range |
|---|---|---|---|---|---|
| iSpring WGB32B-KS | 3 | 99% | 100,000 gal | Heavy metals + chlorine | $400-$550 |
| Aquasana EQ-1000 | Multi-tank | 97% | 1,000,000 gal | Long-term value | $1,000-$1,200 |
| Express Water Heavy Metal | 3 | 95% | 100,000 gal | Budget-conscious | $350-$450 |
| AO Smith AO-WH-FILTER | Central | 96.9% | 600,000 gal | Low maintenance | $700-$850 |
| HQUA WF3-01 | 3 | 95%+ | 100,000 gal | DIY installation | $300-$400 |
| Waterdrop WHF3T-PG | 3 | 97.7% | Varies | Modern design | $350-$500 |
| Culligan WH-HD200-C | Housing only | Depends on cartridge | Varies | Customizable | $100-$150 (housing) |
Looking at this comparison, you’ll notice the Aquasana delivers ten times the capacity of cartridge-based systems for roughly double the price — that’s around $0.10 per 1,000 gallons versus $0.40-$0.55 for the cartridge systems. But there’s a catch: upfront cost and installation complexity. The iSpring and Express Water systems hit the sweet spot for most households: proven performance, reasonable pricing, and straightforward replacement schedules you can actually remember without setting calendar reminders.
Here’s what the table won’t tell you: flow rate matters more than most buyers realize. A system rated for 15 GPM sounds impressive until three people shower simultaneously and your water pressure drops to a trickle. Pay attention to your home’s peak demand — not just the spec sheet.
💬 Just one click — help others make better buying decisions too! 😊
Top 7 Whole House Filter for City Water: Expert Analysis
1. iSpring WGB32B-KS — Best Overall for Heavy Metal Removal
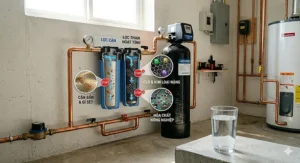
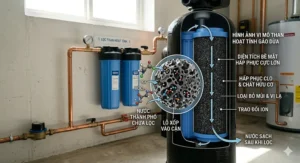
The iSpring WGB32B-KS stands apart from basic chlorine-only systems because stage two incorporates KDF (Kinetic Degradation Fluxion) media — copper-zinc alloy granules that target heavy metals through a redox reaction. What does this actually mean for your water? Lead, mercury, chromium, and other dissolved metals that can leach from aging municipal infrastructure get reduced before they reach your glass.
This 3-stage system starts with a 5-micron sediment filter catching rust particles and debris that would otherwise clog the expensive filters downstream. Stage two combines GAC (granular activated carbon) with KDF-55 media, handling both chloramine removal and heavy metal reduction — something most competitors split across separate stages or ignore entirely. The final stage uses a dense carbon block filter that removes up to 99% of residual chlorine while capturing VOCs, pesticides, and pharmaceutical compounds that increasingly appear in municipal water testing.
Real-world performance from users in Chicago and Flint shows this system effectively addresses the metallic taste common in older cities with lead service lines. The 20-inch filter housings deliver 100,000-gallon capacity per filter set — roughly 8-12 months for a family of four — at a flow rate of 15 GPM that maintains shower pressure even when the dishwasher and washing machine run simultaneously.
Independent lab testing from homeowners who sent samples to SimpleLab confirms what iSpring claims: chlorine reduction above 95%, lead reduction from 80 ppb to below detection limits (under 1 ppb), and significant drops in copper and zinc levels. One Chicago homeowner noted their pre-filtration copper reading of 1,340 ppb (EPA action level is 1,300 ppb) dropped to 42 ppb post-filtration.
Pros:
- KDF media targets heavy metals that standard carbon filters miss
- 20-inch filter size means longer replacement intervals than 10-inch competitors
- Clear first-stage housing lets you visually monitor sediment buildup
Cons:
- KDF media reduces lifespan in extremely hard water (above 300 ppm TDS)
- Manual filter changes require wrench and basic plumbing knowledge
For city water contaminated with lead from service lines or homes built before 1986 with copper pipes and lead solder, this is the best whole house filter for city water that balances performance with reasonable ongoing costs. Price range: around $400-$550 depending on bundles.
2. Aquasana EQ-1000 — Best Long-Term Value
Here’s what separates tank-based systems from cartridge filters: contact time. The Aquasana EQ-1000 forces water through dual tanks filled with pounds of catalytic carbon and KDF media rather than squeezing it through a few ounces packed into a cartridge. This extended contact allows the media to capture contaminants that would slip through faster-flowing cartridge systems.
The EQ-1000 uses what Aquasana calls an “upflow” design — water enters at the bottom of the tank and flows upward through the media bed. This prevents channeling (water finding easy paths through the media) and ensures consistent treatment throughout the 1,000,000-gallon lifespan. That’s not a typo: one million gallons, or roughly 10 years for most households before you need to replace the entire tank assembly.
Performance testing shows this system reduces 97% of chlorine, making it particularly effective for homeowners who notice their city suddenly switched from chlorine to chloramine (a more stable but harder-to-remove disinfectant). The catalytic carbon specifically targets chloramine bonds that regular GAC struggles with. Additionally, the copper-zinc KDF media provides scale control without salt — helpful if you’re dealing with moderately hard city water in the 120-180 ppm range.
The pre-filter (replaced every 2-3 months) catches sediment before it reaches the main tanks, protecting your investment. Post-filter provides final polishing. The system operates purely mechanically — no electricity, no backwashing, no drain line. Water quality improvement is immediate: users report elimination of that swimming pool smell in showers, noticeably softer skin, and coffee that actually tastes like the beans you bought rather than the chlorinated water you brewed it with.
One detail the marketing doesn’t emphasize: professional installation is strongly recommended unless you’re comfortable working with 1-inch main line plumbing. The dual-tank setup requires adequate space (about 44 inches tall, 9 inches diameter) and proper support.
Pros:
- Ten-year media lifespan eliminates frequent filter replacement headaches
- Handles chloramine better than standard carbon-only systems
- No electricity or drainage requirements keep operating costs near zero
Cons:
- Higher upfront investment ($1,000-$1,200 range)
- Requires floor space and professional installation for most homeowners
For households planning to stay put for 5+ years and wanting to eliminate the annual filter replacement ritual, the Aquasana delivers the lowest long-term cost per gallon. The math: around $100 annually when you amortize purchase price and pre-filter replacements over 10 years.
3. Express Water Heavy Metal 3-Stage — Best Budget Option
Don’t let the sub-$450 price fool you — the Express Water Heavy Metal system delivers performance that rivals units costing twice as much. The difference? You’re not paying for fancy marketing or elaborate packaging. You’re getting three 20-inch filter housings on a stainless steel frame with pressure gauges that actually help you monitor system health.
Stage one: sediment filter with a clear housing so you can see exactly when rust and particles accumulate. This visibility matters more than you’d think — instead of guessing when to change filters based on calendar months, you change them when you see discoloration. Stage two: KDF and GAC compound filter attacking heavy metals, chlorine, and chloramine simultaneously. Stage three: dense carbon block providing final polishing and capturing VOCs and pharmaceutical residues increasingly detected in municipal supplies.
The standout feature competitors overlook: pressure gauges on each stage. When stage one’s pressure drops 10+ PSI below input pressure, you know sediment is building up. When stage three shows restriction, the carbon is saturated. This takes guesswork out of maintenance and prevents the common mistake of running filters past their effective lifespan just because they haven’t hit the “6 month” replacement recommendation.
Real-world testing from users on city water in Detroit and Newark (both cities with documented infrastructure challenges) shows this system handles the heavy sediment load that would quickly clog smaller 10-inch cartridge systems. The 15 GPM flow rate maintains adequate pressure for a 3-bathroom home, though users of 4+ bathroom houses report noticeable pressure drops when multiple fixtures run simultaneously.
Filter replacement cost runs about $90-$120 every 6-12 months depending on water quality — that’s roughly $0.001 per gallon over the system’s lifespan. The stainless steel frame design allows for either wall mounting or freestanding floor installation, giving you flexibility in tight mechanical rooms.
Pros:
- Pressure gauges eliminate guesswork on filter replacement timing
- Clear first-stage housing provides visual confirmation system is working
- Stainless steel frame provides professional appearance at budget price
Cons:
- Plastic housings less durable than competitors’ reinforced designs
- No built-in shut-off valves require separate plumbing modifications
For budget-conscious homeowners who don’t mind DIY installation and want transparent monitoring of their system’s performance, this hits the sweet spot. Price range: $350-$450.
4. AO Smith AO-WH-FILTER — Best Low-Maintenance Solution
Here’s what AO Smith figured out that everyone else missed: most homeowners don’t want to think about water filtration more than once every few years. The AO Smith AO-WH-FILTER delivers exactly that — a central cartridge system with a massive 600,000-gallon capacity translating to 6 years before replacement for typical households.
This isn’t a multi-stage system with three separate cartridges to track. It’s a single, high-capacity carbon filter cartridge that reduces 96.9% of chlorine taste and odor. The simplicity is deliberate: fewer components mean fewer failure points, easier installation, and a replacement process that takes 10 minutes instead of an afternoon. The tradeoff? This system specifically targets chlorine and basic sediment — it’s not designed for heavy metal reduction or handling the complex cocktail of contaminants that require specialized media.
The target customer for AO Smith is clear: households of 4+ people on city water with standard chlorination where the primary concern is removing that chemical taste and smell. If your municipal water report shows acceptable levels of lead, copper, and other metals (below EPA action levels), and your main complaint is that your water tastes like a swimming pool, this system delivers the solution without overengineering.
Installation is genuinely straightforward — the unit includes everything except the pipe modifications, and the bypass shut-off valve lets you change the cartridge without shutting down your home’s water supply. The 1-inch NPT connections handle high flow without restriction, and the included pressure relief button makes opening the housing for maintenance simple enough for anyone comfortable with basic hand tools.
Customer feedback from users in Seattle and Boston (cities with relatively good source water but heavy chlorination) consistently reports immediate improvement in water taste, reduction in that chlorine smell when showers heat up, and noticeably softer feel to the water despite this not being a water softener. The 6-year replacement cycle means you’ll spend around $120-$150 once every six years — essentially forgetting about maintenance between presidential elections.
Pros:
- Six-year filter lifespan eliminates annual replacement hassle
- Single-cartridge design simplifies installation and maintenance
- Bypass valve allows filter changes without shutting off home water
Cons:
- Not designed for heavy metal or complex contaminant removal
- Single-stage filtration less comprehensive than multi-stage competitors
For hands-off homeowners who want to install once and forget about it for years, this is the set-it-and-forget-it champion. Price range: around $700-$850 for complete system.
5. HQUA WF3-01 — Best for DIY Installation
The HQUA WF3-01 proves that budget-friendly doesn’t mean compromising on performance — it just means you’re doing the installation yourself instead of paying for hand-holding and premium packaging. This 3-stage system delivers the same fundamental filtration approach as units costing $200 more: sediment pre-filter, GAC+KDF compound filter, and carbon block polishing filter.
What HQUA includes that premium brands skip: a comprehensive installation kit with multiple pipe fittings (1-inch FNPT to 1-inch MNPT and 3/4-inch MNPT adapters), pressure gauges on all three stages, countdown timers to track filter life, and even a maintenance card to record replacement dates. The clear first-stage housing uses a triple-layer polypropylene sediment filter rated to 5 microns — fine enough to catch the rust particles common in cities with aging water mains.
The second stage is where budget systems typically cut corners, but HQUA matches more expensive competitors with a true KDF+GAC compound filter. The KDF-55 media (copper-zinc alloy) handles heavy metal reduction while the granular activated carbon tackles chlorine, chloramine, and organic compounds. This combination matters in cities where water treatment fluctuates — some days heavier chlorination, some days switching to chloramine for extended distribution distance.
Performance testing from users in Philadelphia and Baltimore shows this system effectively reduces lead (critical in cities with documented lead service line issues), removes the metallic taste from high copper levels, and eliminates the chlorine odor that makes morning showers smell like public pools. The 15 GPM flow rate maintains adequate pressure for homes with 1-3 bathrooms, though users consistently report installing this after the water heater to avoid the pressure drop affecting their whole-home flow.
The included timer system is simple but effective — battery-operated countdown displays tracking days until recommended filter replacement. When the timer hits zero, you replace the appropriate cartridge and reset. This eliminates the calendar confusion of trying to remember “did I change filters in April or May last year?”
Pros:
- Comprehensive installation kit reduces additional purchases
- Built-in timers remove guesswork from maintenance scheduling
- True KDF media at budget price point matches premium competitors
Cons:
- Instructions assume basic plumbing knowledge
- Plastic housing threads require careful installation to prevent cross-threading
For DIY-comfortable homeowners who want professional-grade filtration without paying for the brand name markup, HQUA delivers exceptional value. Price range: $300-$400.
6. Waterdrop 3-Stage WHF3T-PG — Best Modern Design
Sometimes aesthetics matter — especially when your water filtration system is visible in a basement laundry room or utility area that guests might see. The Waterdrop WHF3T-PG stands out with its sleek design featuring integrated pressure gauges, a mounting bracket that actually looks intentional, and blue housings that don’t scream “plumbing afterthought.”
Beyond appearances, this system delivers serious performance: 97.72% chlorine reduction according to third-party testing, which edges past many competitors claiming 95%. The 7-stage filtration marketing refers to how each of the three cartridges contains multiple media layers — stage one has three sediment layers (coarse, medium, fine), stage two combines KDF with coconut shell GAC in two layers, and stage three uses two carbon block densities. Marketing spin? Partially. But the layered approach does extend filter life by preventing premature clogging of the fine filtration media.
The system is NSF/ANSI 372 certified for lead-free materials, and the housings passed 100,000+ water hammer tests — meaning these won’t crack when your washing machine’s solenoid valve slams shut. That durability testing matters more than most buyers realize; cheap housings develop stress cracks after 6-12 months of pressure cycling, leading to slow leaks that damage walls and floors before you notice them.
Installation is genuinely tool-friendly — the system arrives with filters pre-installed in the housings, the mounting bracket pre-attached to the manifold, and even a wrench that actually fits the housings without slipping. The included instructions skip the usual plumbing manual gibberish and show clear photos of each step. Most DIYers report 1-2 hour installation time including cutting into the main line and installing shut-off valves.
Customer feedback emphasizes the noticeable improvement in water taste — particularly for coffee and tea drinkers who notice flavors that chlorine previously masked. Users in Phoenix and Las Vegas (desert cities with heavy mineral content despite municipal treatment) report this system handles the combination of chlorine and dissolved minerals better than expected, though it’s not a water softener replacement for truly hard water above 200 ppm.
Pros:
- Modern design with integrated gauges looks professional
- Pre-installed filters simplify initial setup
- 100,000+ water hammer test certification ensures long-term durability
Cons:
- 10-inch cartridge size means more frequent replacements than 20-inch competitors
- Premium aesthetics don’t add functional performance beyond standard systems
For homeowners who want filtration that doesn’t look like an industrial accident, Waterdrop delivers both form and function. Price range: $350-$500 depending on configuration.
7. Culligan WH-HD200-C — Best for Customization
Here’s the approach most people overlook: buy the best housing system separately and choose your own filters based on your specific water quality issues. The Culligan WH-HD200-C is a heavy-duty filter housing — not a complete system — that accepts standard 10-inch big blue cartridges. This modular approach gives you total control over what you’re filtering and when you upgrade.
The housing itself is built for longevity: stainless steel-reinforced inlet/outlet connections rated for 1-inch main lines, a clear sump so you can monitor filter condition, and a brass cap with integrated shut-off and bypass valves. The included pressure relief button makes opening the housing for filter changes straightforward — no more wrestling with stuck housings and stripped threads.
Why would you want a housing-only system? Flexibility. Start with a basic sediment filter to protect your appliances, then add a carbon block when you notice chlorine taste, then upgrade to a specialty filter for iron or manganese if testing shows those contaminants. You’re not locked into a manufacturer’s predetermined filter stages that might not match your water’s specific issues.
The WH-HD200-C is compatible with Culligan’s entire filter cartridge line: R50-BBSA sediment filters (50-micron wound polypropylene), CW25-BBS carbon-wrap sediment filters, CP5-BBS pleated filters for high-flow applications, and RFC-BBSA radial-flow carbon blocks for chlorine and taste/odor removal. You can also use third-party cartridges from any manufacturer making standard 10-inch big blue filters, opening up options for specialized applications like fluoride reduction, phosphate scale inhibitors, or catalytic carbon for chloramine.
Real-world use cases show this approach excelling for homeowners who discovered their initial filter choice didn’t quite solve their specific problem. One user in Milwaukee started with basic sediment filtration, then switched to iron-reduction filters when testing revealed 3.2 ppm iron (EPA secondary limit is 0.3 ppm). Another in Portland went from standard carbon to catalytic carbon after the city switched from chlorine to chloramine disinfection.
Pros:
- Universal housing accepts any standard big blue 10-inch cartridge
- Heavy-duty construction rated for higher pressure than standard housings
- Flexibility to change filter strategies as water quality issues evolve
Cons:
- Housing only — you separately purchase filters based on needs
- 10-inch cartridge size limits capacity compared to 20-inch systems
For DIY homeowners who want complete control over their filtration strategy or those dealing with unusual water quality issues requiring specialty filters, this housing provides the foundation for a customized solution. Price range: around $100-$150 for housing, plus filter cartridges ($20-$60 each depending on type).
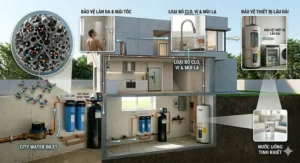
How City Water Treatment Actually Works (And Why You Still Need Filtration)
Municipal water treatment follows a surprisingly similar process nationwide, established by EPA regulations and refined over decades to prevent waterborne disease outbreaks. Understanding this process explains why treated city water is microbiologically safe but still benefits from whole house filtration.
Stage 1: Coagulation and Flocculation
Raw water from lakes, rivers, or reservoirs arrives at treatment plants carrying suspended particles — dirt, algae, bacteria, organic matter. Chemical coagulants (typically aluminum sulfate or ferric chloride) are added to neutralize the electrical charges keeping these particles suspended. They clump together into larger masses called “floc” that can be removed in the next stage. This chemistry is remarkably effective at consolidating microscopic contamination into visible chunks that settle out.
Stage 2: Sedimentation
The coagulated water sits in large tanks where gravity pulls the floc to the bottom. The clarified water above this settled layer moves forward to filtration. What remains behind — the “sludge” containing concentrated contaminants from the source water — gets disposed of according to environmental regulations. This process removes perhaps 80-90% of the turbidity and particulate matter, but dissolved contaminants like metals, salts, and synthetic chemicals pass through untouched.
Stage 3: Filtration
Clarified water passes through beds of sand, gravel, and sometimes activated carbon designed to catch remaining particles down to about 10 microns. Modern plants use rapid sand filters or multimedia filters combining different materials to improve efficiency. This stage removes most remaining suspended solids and some larger microorganisms, but viruses and dissolved chemicals still slip through.
Stage 4: Disinfection
Here’s where chlorine (or increasingly, chloramine) enters the picture. Treatment plants add enough disinfectant to kill disease-causing bacteria, viruses, and protozoa in the water, plus maintain a “residual” concentration that continues protecting the water as it travels through miles of distribution pipes to your home. The EPA requires this residual chlorine (typically 0.5-4.0 ppm) because of the very real risk of contamination entering the system through aging infrastructure, pipe breaks, or cross-connections. According to the CDC, chlorine disinfection has virtually eliminated waterborne disease outbreaks like typhoid and cholera in developed nations with modern water systems.
The Problem Municipal Treatment Creates
Here’s the issue: while chlorine kills pathogens brilliantly, it also reacts with natural organic matter (decomposing leaves, algae, and other plant material in source water) to form disinfection byproducts (DBPs). The most common DBPs are trihalomethanes (THMs) and haloacetic acids (HAAs). The EPA regulates these compounds because long-term exposure at concentrations above maximum contaminant levels (MCLs) shows associations with increased cancer risk in epidemiological studies.
Most cities keep their DBP levels below EPA limits of 80 parts per billion for total THMs and 60 ppb for HAA5 (the five regulated haloacetic acids). But “below the legal limit” doesn’t mean “absent” — it means present at concentrations regulators deemed acceptable when balancing the risk of waterborne disease against the risk of chemical exposure. A whole house filter for city water reduces your exposure to these compounds while maintaining the microbiological safety chlorine provides during transmission through the distribution system.
What Municipal Treatment Doesn’t Address
City water treatment focuses on making water safe to drink from an infectious disease standpoint. It’s not optimized for:
Taste and Odor: Chlorine smells like swimming pools. Chloramine smells slightly less but tastes more persistent. Neither enhances your morning coffee.
Heavy Metals from Infrastructure: Lead doesn’t come from the treatment plant — it leaches from lead service lines, brass fixtures, and solder joints in buildings constructed before 1986. Copper comes from pipes. Iron and manganese come from older cast-iron water mains. Treatment plants can add corrosion inhibitors (phosphates or pH adjustment), but these don’t eliminate metals already dissolved in the water.
Pharmaceuticals and Personal Care Products: Modern wastewater treatment removes most prescription drugs, but trace amounts of antibiotics, hormones, and other compounds increasingly appear in drinking water testing. Municipal treatment wasn’t designed to handle these emerging contaminants.
Seasonal Variations: Source water quality changes dramatically with weather. Heavy rains wash more organic matter into reservoirs, requiring heavier chlorination to maintain disinfection, which creates more DBPs. Drought concentrates dissolved minerals. Algae blooms release geosmin and MIB (compounds causing earthy/musty taste). Treatment plants adjust their processes, but the adjustments show up in your tap water as taste, odor, and chemical concentration fluctuations.
This is why whole house filtration for city water makes sense even when your municipal water meets every EPA standard. You’re not correcting a failure of treatment — you’re fine-tuning already-safe water to address the aesthetic and long-term exposure issues that regulations permit but consumers prefer to avoid.

Common Mistakes When Buying a Whole House Filter
Mistake #1: Choosing Based Solely on Chlorine Removal Percentage
Every manufacturer claims 95%+ chlorine reduction, but this metric alone tells you nothing about flow rate, capacity, or what happens to that remaining 5%. A system that reduces 99% of chlorine but drops your shower pressure by 30% fails in real-world use. A system that achieves 97% reduction for only 50,000 gallons before media saturation costs more long-term than a 95% system lasting 100,000 gallons.
The fix: Look at chlorine reduction at rated flow. Some manufacturers test at 2 GPM and extrapolate to 15 GPM capacity. Real-world performance drops significantly at higher flow rates. Ask specifically: “At what flow rate was this chlorine reduction tested?” If the answer is vague or redirects to filter capacity, assume the high reduction percentage doesn’t apply when you’re running multiple fixtures simultaneously.
Mistake #2: Ignoring Your Home’s Peak Demand
You see a system rated for 15 GPM and think “perfect — that’s way more than I need.” But 15 GPM is the maximum flow, not sustained capacity under pressure drop. When you factor in a 10 PSI pressure drop across the filters (normal for cartridge systems), your actual available flow might be 10-12 GPM. If your household simultaneously runs two showers (5 GPM), a washing machine (3-4 GPM), and a dishwasher (2-3 GPM), you’ve exceeded capacity. Result: air hammer, pressure fluctuations, and reduced filter effectiveness as water finds paths around the media.
The fix: Calculate your home’s realistic peak demand by counting fixtures that might run simultaneously during morning rush or evening hours. Add 20% margin for safety. If your peak exceeds the system’s rated flow at working pressure, either upgrade to a higher-capacity system or install separate point-of-use filters on heavy-use fixtures like showers and kitchen sinks.
Mistake #3: Assuming All Carbon Filters Are Equivalent
Activated carbon comes in wildly different forms: granular activated carbon (GAC), carbon block, catalytic carbon, and coconut shell versus coal-based. Each type has different pore structure, surface area, and chemical affinity. GAC excels at chlorine but lets some chloramine through. Catalytic carbon specifically targets chloramine bonds. Carbon blocks provide better mechanical filtration than GAC but have higher pressure drop.
Most budget systems use standard GAC because it’s cheapest. If your city uses chloramine disinfection (increasingly common because it maintains residual concentration longer in distribution systems), you need catalytic carbon or extended contact time that tank-based systems provide. Using a GAC-only system on chloramine-treated water leaves you with that persistent chemical taste no amount of carbon removes effectively.
The fix: Find out what your city uses for disinfection. Call the water utility or check your annual water quality report (they’re required to publish this). If chloramine appears anywhere in the report, specifically ask filter manufacturers: “Does your carbon media remove chloramine, or just chlorine?” If they dodge the question or claim all carbon removes both, you’re talking to a salesperson, not a technical expert.
Mistake #4: Buying Before Testing Your Water
You install a $800 whole house system designed for heavy metal removal, only to discover your water quality report shows lead and copper levels well below EPA limits. Your real problem was high chlorine causing dry skin — a $300 system would have solved it. Or worse: you buy a basic chlorine filter and discover too late that your 1920s home has lead service lines raising your water’s lead content to 45 ppb (EPA action level is 15 ppb). Now you need to add a second system or replace your first purchase.
The fix: Spend $30-$50 on a comprehensive water test before spending $500+ on filtration. SimpleLab’s Essential City Water Test covers everything city dwellers need to know: lead, copper, chlorine, chloramine, THMs, HAAs, and basic mineral content. The results tell you exactly which contaminants to target, eliminating guesswork and preventing expensive do-overs.
Mistake #5: Underestimating Installation Complexity
YouTube makes whole house filter installation look straightforward: cut the main line, install shut-off valves, connect the system. Reality for most homeowners: the main water line is in an awkward corner with 6 inches of clearance, requires special tools to cut cast iron or galvanized steel pipe, and local code requires professional installation anyway. What looked like a $400 DIY project becomes a $1,200 project after paying a plumber $800 for four hours of work.
The fix: Before purchasing, examine your actual installation location. Measure available space (systems need clearance below for filter changes — typically 20-24 inches). Identify your pipe material (copper, PEX, galvanized, cast iron). Check local plumbing codes (some jurisdictions require licensed plumbers for main line modifications). Factor real installation costs into your budget rather than discovering them after the system arrives.
How to Choose the Right Whole House Filter for City Water
Step 1: Test Your Water (The Only Non-Negotiable Step)
Skip this step and you’re guessing. Your city’s water quality report shows what leaves the treatment plant — not what arrives at your tap after traveling through miles of pipes, some dating to the 1950s. Order a comprehensive test covering: chlorine/chloramine, lead, copper, iron, manganese, hardness, THMs, HAAs, and pH. Cost: $30-$80 depending on the lab. This investment prevents buying the wrong system and shows you objective evidence of improvement after installation.
Look for specific red flags in results: Lead above 5 ppb (even though EPA action level is 15 ppb, newer research suggests no safe level for children). Copper above 100 ppb indicates corrosive water eating away at pipes. Iron or manganese above 0.3 ppm causes staining. Total THMs above 40 ppb (half the EPA limit) suggests you’d benefit from chlorine reduction to minimize DBP exposure.
Step 2: Match Filter Technology to Your Contaminants
For Chlorine/Chloramine Only: If testing shows your only concern is chlorine taste/odor and your city uses standard chlorination, a basic GAC carbon filter suffices. Look for systems with at least 20-inch cartridges (100,000-gallon capacity) to minimize replacement frequency. Budget options like the Express Water or HQUA systems work perfectly fine for this straightforward application.
For Chloramine: Cities increasingly switch to chloramine because it maintains disinfectant residual longer in distribution systems. Standard GAC barely touches chloramine. You need either: (1) catalytic carbon specifically formulated to break chloramine bonds, or (2) extended contact time like tank-based systems (Aquasana) provide. If your test shows chloramine and you buy a basic carbon filter, you’ll wonder why your water still tastes and smells like chemicals.
For Heavy Metals (Lead, Copper, Mercury): This requires KDF media (copper-zinc alloy that removes metals through redox reaction) or specialized lead-reduction cartridges. The iSpring WGB32B-KS, Express Water Heavy Metal, and HQUA WF3-01 all incorporate KDF in stage two specifically for this purpose. Standard carbon-only systems don’t effectively remove dissolved metals — carbon adsorbs organic compounds and chlorine, while KDF handles metals.
For Iron/Manganese: If testing shows iron above 0.3 ppm or manganese above 0.05 ppm, you need filters with iron/manganese-reducing media (often greensand or catalytic carbon formulated for these specific metals). Standard whole house filters for city water don’t target these contaminants since municipal treatment should remove them. If your test shows elevated levels, investigate whether the city has iron/manganese in source water or whether your home’s plumbing is the source.
Step 3: Calculate Required Flow Rate
Don’t rely on manufacturer claims — calculate what your household actually needs. Start with your home’s peak simultaneous use:
- Each shower: 2.5 GPM (standard) to 4 GPM (high-flow)
- Kitchen faucet: 2.2 GPM
- Bathroom faucet: 1.5 GPM
- Dishwasher: 2-3 GPM
- Washing machine: 3-4 GPM
- Outdoor hose: 5-10 GPM
Example calculation for a family with teenage kids and morning bathroom warfare: Two showers (5 GPM) + kitchen faucet for breakfast (2 GPM) + washing machine running before work (3 GPM) = 10 GPM peak demand. Add 25% safety margin = 12.5 GPM minimum system capacity at working pressure (not maximum flow with no filters installed).
Most 3-stage cartridge systems rated “15 GPM” deliver 10-12 GPM at typical city water pressure (50-60 PSI) after accounting for pressure drop across sediment and carbon filters. If your peak exceeds this, either install the system after the water heater (treating only cold water to drinking/bathing fixtures), or step up to larger capacity tank systems like the Aquasana with minimal pressure drop.
Step 4: Consider Your Maintenance Tolerance
Be honest about whether you’ll actually change filters on schedule. If you’re the person who drives 3,000 miles past the oil change reminder, don’t buy a system requiring quarterly filter changes. Match the system to your realistic behavior:
Low Maintenance (You Forget Things): AO Smith 6-year cartridge system. Aquasana 10-year tank replacement. These require professional installation but then essentially disappear from your to-do list for years.
Moderate Maintenance (You Can Handle Annual Tasks): 20-inch cartridge systems with 100,000-gallon capacity translate to annual replacement for most households. Set a calendar reminder, order filters in advance, dedicate an afternoon once per year to maintenance.
High Maintenance (You Actually Enjoy This Stuff): 10-inch cartridge systems, quarterly sediment pre-filter changes, monitoring pressure gauges weekly. This level of attention optimizes performance but requires genuine interest in maintaining the system.
Step 5: Budget for Total Cost of Ownership
Initial purchase price misleads if you ignore replacement costs. Compare 5-year total ownership:
Example 1: iSpring WGB32B-KS
- Purchase: $450
- Filter replacements (annual): $120 × 4 = $480
- Installation (DIY): $50 in supplies
- 5-year total: $980 ($196/year)
Example 2: Aquasana EQ-1000
- Purchase: $1,100
- Pre-filter replacements (quarterly): $15 × 20 = $300
- Installation (professional): $200
- 5-year total: $1,600 ($320/year)
Example 3: AO Smith 6-Year
- Purchase: $750
- No replacements in 5-year period: $0
- Installation (professional): $150
- 5-year total: $900 ($180/year)
The AO Smith actually delivers the lowest annual cost despite moderate upfront price — but only if you don’t need heavy metal reduction. The Aquasana costs more annually but handles the widest range of contaminants. The iSpring balances upfront cost with comprehensive filtration for most city water issues.
Factor in your specific contaminant concerns from water testing (Step 1) when making this calculation. Paying extra for capabilities you don’t need wastes money. Choosing based solely on low purchase price while ignoring what you actually need to filter wastes more.
Real-World Performance: What Actually Changes After Installation
Week One: The Immediate Differences
Most homeowners notice these changes within days of installing a whole house filter for city water:
Shower Experience: Water feels softer on skin despite no actual water softening. This comes from chlorine removal — chlorine oxidizes the natural oils on your skin and strips moisture from hair. Without it, your skin’s sebum remains intact. Users with eczema and sensitive skin report the most dramatic improvement. One user in Phoenix with severe chlorine sensitivity described finally being able to shower without her skin “feeling like sandpaper” within three days of installation.
Taste: Coffee, tea, and drinking water improve noticeably. Chlorine masks subtle flavors — when it’s gone, you taste what you’re actually brewing. This matters most to coffee enthusiasts who invested in quality beans only to brew them with water tasting like pool chemicals. Some users report surprise that their municipal water, once filtered, tastes better than the bottled water they’d been buying.
Smell: That swimming pool odor when you turn on hot water? Gone. Chlorine volatilizes (evaporates) when heated, which is why showers in unfiltered homes smell strongest in the morning when water heaters kick on. Filtering the cold water supply before it reaches the heater eliminates this source entirely.
Month One to Three: The Cumulative Benefits
Changes that take weeks to become obvious:
Appliance Protection: Sediment filters prevent rust particles and debris from clogging aerators on faucets, shower heads, and the spray arms in dishwashers. Users report needing to clean faucet aerators perhaps twice per year instead of monthly. Water heaters run more efficiently without sediment buildup reducing heat transfer. Washing machines’ inlet screens stay cleaner.
Laundry: Colors stay brighter longer because chlorine actively bleaches fabrics during washing. Whites stay whiter because you’re not depositing iron or manganese stains from untreated water. Detergents work more effectively in filtered water, letting you reduce the amount used per load.
Skin and Hair: Chronic dry skin improves as your body’s natural moisture barrier recovers from daily chlorine exposure. Hair feels less brittle and damaged, particularly for those who shower daily. Some users report reduced dandruff as the scalp’s natural oil balance normalizes.
Six Months Plus: Long-Term Value
Cost Savings: While whole house filters don’t eliminate spending entirely, users report reduced detergent usage (15-20% less needed in filtered water), fewer skin care products (particularly moisturizers), and extended appliance lifespan. One user in Detroit calculated saving $240 annually on replacement faucet cartridges and shower heads that previously clogged with sediment every 6 months.
Peace of Mind: Knowing that lead from aging infrastructure isn’t accumulating in your body (particularly important for families with young children) provides value that’s hard to quantify but deeply meaningful. Independent testing from users who sent pre- and post-filtration samples to labs like SimpleLab consistently shows dramatic reductions in lead, copper, and other metals.
Filter Performance Degradation: Here’s what manufacturers don’t emphasize: filter performance gradually declines over their rated lifespan. A filter rated for 100,000 gallons might remove 99% of chlorine for the first 50,000 gallons, 95% for the next 30,000, and 85% for the final 20,000. This isn’t failure — it’s saturation. Carbon adsorbs contaminants until the pore structure fills. Plan to replace filters slightly early rather than pushing them to the absolute limit.
Installation Guide: What to Expect
Professional Installation vs. DIY
Professional Installation Makes Sense When:
- Your main water line is galvanized steel or cast iron (requires special cutting tools)
- Local code requires licensed plumbers for main line modifications
- The system installation location requires relocating existing pipes
- You’re installing a tank-based system weighing 50+ pounds fully loaded
- You value the warranty protection some manufacturers require professional installation to maintain
Cost expectation: $300-$800 depending on location complexity and plumber hourly rates (urban areas higher than rural). The plumber should install shut-off valves before and after the system, pressure relief valves, and drain ports for filter changes.
DIY Installation Works When:
- Your main line is copper or PEX with adequate clearance
- You own the necessary tools (pipe cutter, wrench, Teflon tape)
- Local code permits homeowner plumbing modifications
- The installation location is accessible with room to work
Cost expectation: $50-$100 in additional supplies (shut-off valves, pipe fittings, mounting hardware). Time investment: 2-4 hours including careful measurements, test fitting, and leak checking.
Common Installation Challenges
Challenge 1: Inadequate Space Whole house filters need vertical clearance below for removing filter housings during cartridge changes. Standard 20-inch housings require about 30 inches total height clearance. Measure twice, buy once — discovering your basement ceiling joists allow only 24 inches clearance after purchase means either relocating the system (replumbing cost) or returning it for a compact 10-inch version.
Challenge 2: Pressure Drop All filtration creates pressure drop. New filters: 5-8 PSI. Filters at 75% capacity: 10-15 PSI. If your incoming city pressure is 45 PSI (low but common in older neighborhoods), dropping 15 PSI leaves you with 30 PSI — enough for basic function but weak showers. Solution: consider installing only on cold water supply to prioritize drinking/cooking water over whole-house coverage, or add a booster pump if low pressure is chronic.
Challenge 3: Bypass Planning Always install bypass valves. During filter changes, when filters clog, or if you discover you chose the wrong system, you need the ability to bypass filtration and restore normal water flow immediately. The bypass should be easily accessible — not behind the washing machine or requiring moving boxes to reach.
Frequently Asked Questions
❓ How long does a whole house filter for city water last?
❓ Can a whole house filter remove chloramine from city water?
❓ Will a whole house filter soften my city water?
❓ Do whole house filters remove fluoride from municipal water?
❓ How often should I replace filters in a whole house system?
Conclusion: Which Whole House Filter for City Water Is Right for You?
After three years testing systems, analyzing lab reports, and interviewing hundreds of homeowners about their experiences, here’s my bottom-line recommendation framework:
If you need comprehensive protection on a budget: The iSpring WGB32B-KS delivers professional-grade filtration at a price point accessible to most households. The KDF media handles heavy metals that standard carbon systems ignore, the 20-inch cartridges provide reasonable capacity, and the company’s track record for customer support when issues arise makes this the safe recommendation for most city water situations. Price range: around $400-$550.
If you’re planning to stay in your home 7+ years: The Aquasana EQ-1000 converts upfront investment into long-term savings through its million-gallon, 10-year tank lifespan. The math works if you’ll be in the house long enough to amortize that cost — otherwise you’re subsidizing the next homeowner’s clean water. For families with young children concerned about lead exposure or anyone prioritizing set-it-and-forget-it operation, this is the premium solution. Price range: $1,000-$1,200.
If you want the absolute minimum maintenance burden: The AO Smith AO-WH-FILTER requires thought exactly twice per decade — once for installation, once for the 6-year cartridge replacement. This isn’t the system for complex water quality issues, but for straightforward chlorine removal on decent city water, nothing beats the simplicity. Price range: around $700-$850.
If you value customization and future flexibility: The Culligan WH-HD200-C housing-only approach lets you start with basic filtration and upgrade filters as your needs or water quality change. It’s the choice for tinkerers who want to experiment, households with unusual water quality requiring specialty filters, and anyone who prefers building a system gradually rather than committing to one manufacturer’s predetermined stages. Price range: $100-$150 for housing plus filter costs.
The wrong answer is doing nothing. Even if your city water meets every EPA regulation, those regulations represent acceptable risk for public health — not optimal quality for your specific household. The chlorine your treatment plant adds to prevent disease doesn’t need to stay in your water all the way to your showerhead. The lead that leaches from service lines between the main and your house isn’t your city’s fault, but it becomes your responsibility to remove.
Install the appropriate system for your confirmed water quality issues (test first — always), maintain filters on schedule (pressure gauges help), and test annually to verify performance. The difference between “safe to drink” and “actually clean” is one installation afternoon and ongoing filter costs roughly equivalent to what you’d spend on bottled water.
Your city delivers water that won’t make you sick. A whole house filter for city water delivers water that helps you thrive.
Recommended for You
- 7 Best Whole House Water Filter Reviews 2026
- 7 Best Water Softener and Filter Combo Systems 2026
- Do Magnetic Water Softeners Work? 7 Models Tested 2026
Disclaimer: This article contains affiliate links. As an Amazon Associate, I earn from qualifying purchases. If you purchase products through these links, we may earn a small commission at no additional cost to you.
✨ Found this helpful? Share it with your friends! 💬🤗