In This Article
Hard water wreaks havoc on your plumbing, appliances, and skin. But here’s the good news—you don’t need to shell out hundreds of dollars for professional installation. Modern water softeners have become remarkably DIY-friendly, with pre-plumbed system options and straightforward drain line setup that even weekend warriors can tackle.
I’ve spent countless weekends helping friends install water softeners, and the transformation is always dramatic. Your water heater efficiency jumps by 25-40%, soap actually lathers, and those stubborn white spots on dishes vanish. According to data from the U.S. Geological Survey, approximately 85% of American homes deal with hard water, making softening systems one of the smartest investments you can make.
The easiest water softener to install typically features quick-connect fittings, pre-assembled bypass valve installation, and clear instructions that don’t require a plumbing degree to understand. Whether you’re dealing with city water or well water, the right system with proper plumbing connection requirements can be up and running in 30 minutes to a few hours. In this guide, I’ll walk you through the top self install water softener system options, break down exactly what makes them DIY-friendly, and show you how to choose the perfect match for your home’s specific needs.
Quick Comparison Table
| Water Softener | Type | Grain Capacity | Installation Time | Price Range | Best For |
|---|---|---|---|---|---|
| iSpring ED2000 | Electronic Descaler | N/A | 15 minutes | $160-$190 | Easiest install, no plumbing mods |
| Whirlpool WHES40E | Salt-Based | 40,000 | 30 minutes | $740-$790 | Quick DIY, mid-size homes |
| Aquasure Harmony | Salt-Based | 30K-48K | 1-2 hours | $350-$550 | Budget-friendly families |
| Yarna CWD24 | Electronic Descaler | N/A | 15 minutes | $189 | Maintenance-free option |
| Fleck 5600SXT | Salt-Based | 48K-64K | 2-3 hours | $600-$1,200 | DIY enthusiasts, reliability |
| Kenmore 350 | Salt-Based | 32,000 | 1-2 hours | $450-$600 | Comprehensive support |
| SpringWell SS | Salt-Based | 32K-80K | 2-4 hours | $1,440-$2,100 | Premium DIY, well water |
💬 Just one click – help others make better buying decisions too! 😊
Top 7 Easiest Water Softener to Install: Expert Analysis
1. iSpring ED2000 Whole House Electronic Descaler – Ultimate DIY Simplicity
If you’re looking for the absolute easiest water softener to install, the iSpring ED2000 electronic descaler is your winner. This innovative system requires zero plumbing modifications—you simply wrap two antenna cables around your main water pipe and plug the unit into a standard outlet. Installation typically takes just 15 minutes, even for complete beginners.
Unlike traditional salt-based systems, the ED2000 uses electromagnetic waves to prevent mineral deposits from forming scale, while keeping beneficial minerals in your water. It works on any pipe type including PEX, PVC, copper, and iron, making it incredibly versatile. The system is designed for water hardness up to 19 grains per gallon and can treat entire homes without the need for drain line setup or bypass valve installation.
Customer feedback consistently praises the installation simplicity, with one homeowner noting it took less time than assembling IKEA furniture. At around $160-$190, it’s also one of the most affordable options. However, it’s worth noting that electronic descalers condition water rather than truly softening it, and effectiveness decreases with high iron content (over 0.3 ppm).
✅ Pros: No plumbing modifications, 15-minute install, works on all pipe types
❌ Cons: Not effective for very hard water (20+ GPG), reduced effectiveness with high iron
2. Whirlpool WHES40E 40,000 Grain Water Softener – 30-Minute Installation Champion
The Whirlpool WHES40E has earned its reputation as one of the best water softener for DIY install, particularly for homeowners who want true softening without spending all weekend on installation. This NSF-certified system can be fully operational in just 30 minutes if you have basic plumbing skills and the right tools.
What makes this system exceptionally DIY-friendly is its demand-initiated regeneration, which means you won’t waste salt or water while you’re on vacation. The 40,000-grain capacity handles households of 1-6 people comfortably, and it removes up to 10 ppm of clear water iron. The unit comes with a pre-assembled bypass valve and straightforward instructions that actually make sense.
Reviewers consistently mention the clear LCD display and simple programming as major advantages. One customer shared that the hardest part was deciding where to install it—the actual installation was “surprisingly painless.” The system requires standard plumbing connection requirements: a 120V outlet, drain access within 30 feet, and connection to your main water line. At around $740-$790, it offers excellent value for the reliability you’re getting.
✅ Pros: Quick 30-minute setup, NSF certified, demand-based regeneration
❌ Cons: Requires salt refills monthly, needs drain access
3. Aquasure Harmony Series – Budget-Friendly DIY Water Softener Installation
The Aquasure Harmony Series proves that affordable doesn’t mean complicated. Available in 30,000, 40,000, and 48,000 grain capacities, this self install water softener system comes pre-filled with premium resin and includes a high-strength stainless steel bypass valve that’s already assembled.
Installation typically takes 1-2 hours for first-timers, partly because the system ships with everything you need including drain lines and installation hardware. The digital metered control head features a backlit display that’s genuinely easy to program—no cryptic codes or confusing buttons. The system automatically calculates regeneration needs based on your actual water usage, which saves both salt and water.
Customer feedback highlights the value proposition. Families appreciate that it costs $200-$300 less than comparable systems while delivering similar performance. The triple-purpose pre-filter removes sediment, chlorine, and VOCs, adding extra value. However, some users note that the instruction manual could be more detailed, though Aquasure’s lifetime US-based tech support fills that gap nicely.
✅ Pros: Pre-filled resin, all hardware included, excellent value
❌ Cons: Instructions could be clearer, smaller brine tank requires more frequent salt additions
4. Yarna Capacitive CWD24 Electronic Descaler – Zero Maintenance DIY Option
The Yarna Capacitive CWD24 represents another ultra-simple electronic solution for those who want minimal hassle. Like the iSpring, this system requires no plumbing work—you wrap the coils around pipes up to 2 inches in diameter and plug it in. The entire installation process takes about 15 minutes, and you’ll never need to add salt, change filters, or perform maintenance.
What sets Yarna apart is its robust ABS plastic case that’s corrosion-resistant and impact-resistant, plus an impressive one-year money-back guarantee. The system uses capacitive technology to alter the crystallization process of minerals, preventing them from adhering to surfaces. Existing scale deposits gradually break down over 3-4 months of continuous use.
Reviews frequently mention the “set it and forget it” nature of the system. One homeowner shared that after two months, their showerhead that had been clogged with deposits was flowing freely again. The $189 price point makes it accessible for budget-conscious DIYers. Keep in mind this is a conditioner rather than a true softener—it won’t remove minerals but will prevent them from causing problems.
✅ Pros: 15-minute install, zero ongoing maintenance, 1-year money-back guarantee
❌ Cons: Not a true softener, takes months to see full results on existing scale
5. Fleck 5600SXT Digital Water Softener – The DIY Enthusiast’s Choice
The Fleck 5600SXT is legendary among how to install water softener yourself communities for good reason. This system uses the most popular and well-documented valve in North America, meaning if you ever need help, thousands of homeowners and professionals can guide you. Installation takes 2-3 hours for most DIYers.
The system ships with resin already loaded in the tank, which eliminates one of the more tedious steps. The digital control head is highly programmable with metered regeneration that cuts salt usage by 40% compared to timer-based systems. Capacity options range from 48,000 to 64,000 grains, making it suitable for various household sizes. The non-volatile memory means you won’t lose your settings during power outages.
What makes this truly DIY-friendly is the massive support network. AFWFilters and other sellers include detailed installation instructions, and YouTube has dozens of walkthrough videos. One reviewer noted, “I’m not handy, but the Fleck community helped me through every step.” Parts availability is exceptional—you can find replacement components anywhere. Prices range from $600 to $1,200 depending on capacity and dealer.
✅ Pros: Huge support community, proven reliability, ships with resin loaded
❌ Cons: Takes longer to install, heavier than compact systems
6. Kenmore 350 Water Softener – Comprehensive DIY Support System
The Kenmore 350 water softener earns its spot for the exceptional installation support Kenmore provides. Their detailed DIY installation checklist walks you through every step, from confirming water pressure (20-125 psi range) to the final programming. Video demonstrations supplement written instructions, covering common installation scenarios.
This 32,000-grain system is ideal for households of 1-4 people and includes demand-initiated regeneration that maximizes efficiency. The high-flow valve maintains water pressure even during regeneration, so you won’t notice disruptions. Installation typically takes 1-2 hours with flex connectors (recommended) or 2-3 hours with rigid piping. The system includes a bypass valve pre-assembled on the unit.
Customer testimonials frequently mention Kenmore’s customer service. One DIYer shared, “I called with a question about drain line elevation, and they walked me through it patiently.” The system handles up to 8 ppm of iron and features salt-saving technology. The included overflow hose and clear programming guide remove guesswork. Pricing falls in the $450-$600 range depending on promotions.
✅ Pros: Excellent installation support, video guides, responsive customer service
❌ Cons: Mid-range capacity, requires specific water pressure range
7. SpringWell SS Salt-Based System – Premium DIY-Friendly Installation
The SpringWell SS represents the top tier of self install water softener systems for serious DIYers who want the best. This system uses 10% crosslink resin (the gold standard for chlorinated city water) and features a Bluetooth-enabled digital control head that lets you monitor and adjust settings from your phone. Installation takes 2-4 hours depending on your existing plumbing setup.
What makes this premium system DIY-friendly is the comprehensive installation kit with quick-connect fittings and exceptionally clear instructions. The system handles up to 81 GPG hardness and can remove up to 7 ppm of iron with proper configuration. Capacity options range from 32,000 to 80,000 grains. The lifetime warranty on tanks, valves, and control head provides peace of mind.
Reviews consistently praise the build quality and performance. One homeowner noted, “This is overbuilt in the best way—I’m confident it’ll outlast me.” The Bluetooth monitoring is genuinely useful for tracking salt levels and water usage. Customer support is US-based (Florida) and highly regarded. The investment ranges from $1,440 to $2,100, but many DIYers consider it a buy-it-for-life purchase. If you have well water or very hard water, this system handles it better than budget alternatives.
✅ Pros: Lifetime warranty, Bluetooth monitoring, handles extreme hardness
❌ Cons: Higher upfront cost, larger footprint than compact models
Understanding DIY Water Softener Installation Basics
Installing your own water softener might seem daunting, but modern systems have eliminated most of the complexity. The process generally involves four key steps: locating the ideal installation spot, connecting to your main water line, setting up the drain connection, and programming the system. Most homeowners complete installation in one afternoon.
The ideal location is near your main water supply entry point, close to a drain, and within reach of a 120V electrical outlet. The area should be level, dry, and protected from freezing temperatures. Basements, utility rooms, and garages typically work well. If you’re installing in an unheated area, insulation becomes critical—frozen pipes can cause catastrophic damage and void warranties.
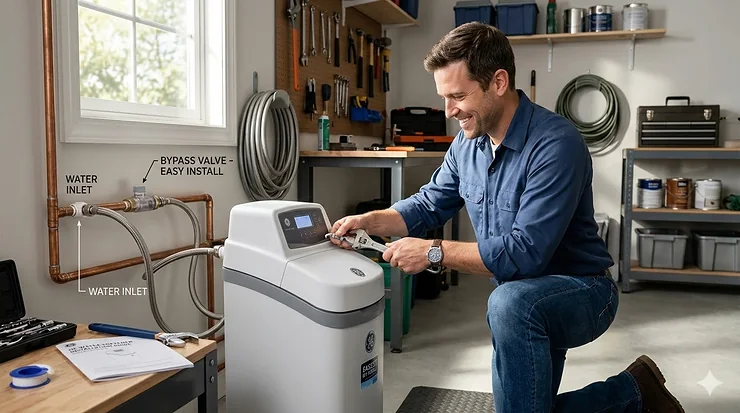
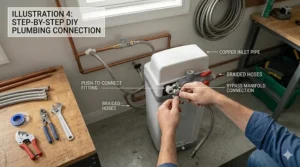
Basic plumbing connection requirements include cutting into your main water line to install the softener in series with your home’s plumbing. Most DIY-friendly systems use compression fittings or quick-connect adapters that eliminate the need for soldering. The bypass valve installation allows you to route water around the softener when needed (for maintenance or if you want unsoftened water for gardens). Pre-plumbed system options come with bypass valves already assembled, saving significant time.
Drain line setup is straightforward but crucial. The softener needs to discharge brine during regeneration, typically to a floor drain, utility sink, or standpipe. The drain should be within 30 feet and not elevated more than 8 feet above the floor. An air gap prevents backflow contamination. Most systems include 12 feet of drain tubing, but you may need additional length depending on your layout.
How to Install Water Softener Yourself: Step-by-Step Process
The DIY water softener installation process follows a logical sequence that minimizes complications. Start by gathering your tools: pipe cutter, adjustable wrenches, Teflon tape, measuring tape, and a bucket for drainage. Have your installation manual handy—even experienced DIYers reference it throughout the process.
Step 1: Shut off and drain your water supply. Turn off the main water valve and open faucets at the highest and lowest points in your house to drain the lines. This prevents water spillage when you cut into the main line. A small amount of water will still drain when you make the cut, so keep that bucket ready.
Step 2: Install the bypass valve. Most pre-plumbed system options have this already assembled, but if not, attach it to the softener inlet and outlet ports. Double-check the flow direction markings—installing it backward is a common mistake that’s annoying to fix later. Use Teflon tape on threaded connections to prevent leaks.
Step 3: Connect to the main water line. Measure carefully and cut the main line where you’ll insert the softener. Use compression fittings or SharkBite-style connectors if you want to avoid soldering. Connect the incoming water to the inlet side of the bypass valve and the outgoing water to the outlet. Verify that water flows through the softener before continuing to the house.
Step 4: Connect drain lines. Attach the drain hose from the control valve and brine tank overflow to your drain, maintaining an air gap as specified in your manual. Secure the drain hose to prevent movement during regeneration cycles. This is where understanding proper drain line setup prevents future headaches.
Step 5: Fill the brine tank with salt and prime the system. Add salt pellets (not rock salt) to the recommended level. Slowly open the bypass valve and check for leaks at all connections. Run water through the house to clear any air from the lines. Program the control head based on your water hardness and household size.
 Plumbing Connection Requirements: What You Actually Need
Understanding plumbing connection requirements before you start prevents mid-installation hardware store runs. Most water softeners require 1-inch NPT (National Pipe Thread) connections, though some compact models use 3/4-inch. Verify your system’s specifications before purchasing fittings.
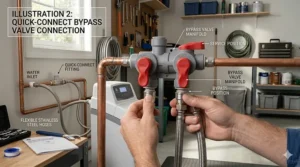
The most DIY-friendly approach uses flexible stainless steel connectors rather than rigid piping. These “flex connectors” simplify installation dramatically because they accommodate slight misalignments and make it easier to position the softener at the correct height. They cost $20-$40 but can save hours of frustration, especially if you’re working alone.
Your existing plumbing might be copper, PVC, CPVC, PEX, or galvanized steel. Each requires different connection methods. Copper traditionally requires soldering, but SharkBite-style push-to-connect fittings eliminate that skill requirement. PEX uses crimp or expansion connections. PVC and CPVC use solvent cement. Check your local plumbing codes—some jurisdictions have specific requirements for water softener installations.
A critical but often overlooked requirement is pressure regulation. Water softeners operate optimally between 20-125 psi, with 50-70 psi being ideal. If your pressure exceeds this range, install a pressure reducer. Conversely, low pressure indicates a potential problem that should be addressed before adding a softener (which will drop pressure slightly).
Consider installing shutoff valves before and after the softener. While not strictly required on pre-plumbed system options with bypass valves, dedicated shutoffs make maintenance simpler. You can isolate the softener completely without affecting the rest of your house. Ball valves work better than gate valves for this application.
Bypass Valve Installation: Your Safety Net for Maintenance
The bypass valve installation is arguably the most important component of your water softener setup. This simple mechanism allows you to route water around the softener when needed—during initial setup, maintenance, or if something goes wrong. Think of it as an ejection seat for your plumbing system.
Most modern self install water softener systems include a three-valve bypass already assembled on the unit. The left and right valves control flow into and out of the softener, while the center valve creates the bypass route. When both side valves are closed and the center is open, water flows straight through without entering the softener. When configured for normal operation, the side valves open and the center closes.
Installation positioning matters more than people realize. The bypass should be easily accessible without moving the entire softener. You’ll need to reach it for maintenance and seasonal adjustments. Mark the valve positions clearly—”normal operation,” “bypass,” and “service”—so anyone in your household can operate it if needed.
Some advanced systems use single-handle bypass valves that simplify operation. One quarter turn switches between bypass and service modes. These cost slightly more but reduce user error. For DIY installations, having clear valve operation instructions prevents confusion during the initial setup and testing phase.
Testing your bypass valve installation before completing the project is essential. Close the main supply, open the bypass, then verify water flows through your house. Next, close the bypass and open the softener valves to confirm water flows through the unit. This five-minute test can save hours of troubleshooting if something’s configured incorrectly.
Best Water Softener for DIY Install: Key Selection Criteria
Choosing the best water softener for DIY install involves balancing multiple factors beyond just ease of installation. Start with your water hardness level—you can get a free test kit from most water softener companies or purchase one at hardware stores for $10-$20. The USGS classifies water hardness as soft (0-60 mg/L), moderately hard (61-120 mg/L), hard (121-180 mg/L), and very hard (over 180 mg/L).
Grain capacity determines how much hardness your softener can remove before requiring regeneration. Calculate your needs by multiplying your hardness level (in grains per gallon) by daily water usage, then multiply by the number of days between regenerations you want. A family of four using 300 gallons daily with 10 GPG hardness needs roughly 42,000-48,000 grains of capacity for weekly regeneration.
Salt-based versus salt-free technology represents a fundamental choice. Salt-based systems using ion exchange actually remove calcium and magnesium, delivering truly soft water. Salt-free conditioners (like the iSpring and Yarna) prevent scale formation but don’t remove minerals. For drinking water taste and soap lathering, salt-based systems perform better. For environmental concerns and zero maintenance, salt-free options appeal to specific users.
Pre-plumbed system options significantly reduce installation complexity. These systems ship with bypass valves assembled, resin tanks pre-filled, and all necessary fittings included. You’re essentially connecting three components—inlet, outlet, and drain—rather than building a complete system from parts. The premium for pre-plumbed units ($50-$100) is usually worth it for DIY installations.
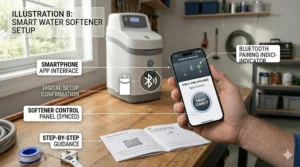
Control valve sophistication affects both ease of use and long-term satisfaction. Digital metered valves regenerate based on actual water consumption rather than fixed schedules, saving 30-40% on salt usage. Bluetooth connectivity (found on premium models like SpringWell) lets you monitor system status from your phone. However, simpler mechanical valves have fewer potential failure points and may last longer.
Self Install Water Softener System: Common Mistakes to Avoid
The most common DIY water softener installation mistake is improper drain line setup. Many homeowners place the drain hose directly into a standpipe or drain without maintaining an air gap. This creates a potential backflow situation where contaminated drain water could siphon into your softener. Always maintain a minimum 1.5-inch air gap between the drain hose and the drain opening.
Undersizing your water softener ranks as the second most frequent error. People see a 32,000-grain system on sale and assume it’ll work for their four-person household, ignoring their actual water hardness. When hardness is 15 GPG instead of the assumed 10 GPG, that “adequate” system regenerates twice as often, wasting salt and water while providing intermittent hard water. Always test your water before selecting capacity.
Forgetting to program the system correctly causes surprisingly common problems. The default settings on most softeners assume 10 GPG hardness and moderate water usage. If your hardness is 18 GPG and you have teenagers taking 20-minute showers, those defaults will leave you disappointed. Spend 10 minutes programming accurate hardness levels, household size, and water usage for dramatically better results.
Installing the softener too far from the water heater creates another subtle issue. Long pipe runs between the softener and water heater mean hard water sits in those pipes, reducing the benefits you experience at hot water taps. While you can’t always control distances in existing homes, try to minimize the run when possible. Some experienced DIYers install a small point-of-use softener at the water heater if the main unit must be distant.
Neglecting to install a sediment pre-filter before the softener shortens resin life, especially with well water. Sand, silt, and rust particles coat the resin beads, reducing their effectiveness. A simple $30 sediment filter installed before the softener extends resin life by years. For pre-plumbed system options, check if a pre-filter is already included (some manufacturers bundle them).
Pre-Plumbed System Options: Worth the Premium?
Pre-plumbed system options typically cost $50-$150 more than equivalent DIY assembly kits, prompting the question: are they worth it? For most homeowners attempting their first water softener installation, the answer is a resounding yes. The time savings alone justifies the modest premium.
These systems arrive with bypass valves already attached, resin tanks pre-filled, and all internal connections completed. You’re left with three primary tasks: positioning the unit, connecting inlet/outlet water lines, and routing the drain hose. This reduces installation time from 3-4 hours to 1-2 hours for typical setups. The reduction in potential error points is equally valuable.
Quality pre-plumbed systems undergo factory testing that verifies all components function correctly. You’re less likely to encounter a defective valve or improper resin filling. Some manufacturers, like Aquasure and Whirlpool, test each unit under pressure before shipping. While this doesn’t eliminate all potential issues, it significantly reduces them.
The “unboxing experience” matters more for DIY installations than people realize. Pre-plumbed units typically include color-coded fittings, labeled hoses, and instruction manuals that reference the actual assembled unit rather than generic parts diagrams. This user-focused approach reduces confusion, especially for less experienced DIYers. Customer support staff can also provide more specific guidance when everyone’s unit looks identical.
However, pre-plumbed system options aren’t universally superior. Experienced DIYers who want maximum customization might prefer assembly kits that let them choose specific components. If you’re installing in an unusual configuration or have specific space constraints, building from parts offers more flexibility. The cost savings ($50-$150) may also matter for tight budgets.
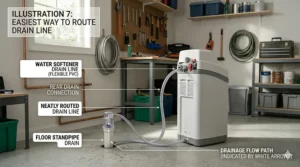
Drain Line Setup: The Critical Detail Most DIYers Overlook
Proper drain line setup prevents the most common post-installation problems with water softeners. During regeneration, your system discharges 20-60 gallons of brine solution that must reach a drain without flooding your space or causing backflow. Getting this right the first time saves frustration.
Drain options include floor drains, utility sinks, standpipes, and direct connections to drain lines. Floor drains offer the simplest setup—just position the hose above the drain with an air gap. Utility sinks work similarly but keep the hose secured to prevent it from falling out during the regeneration’s pressure surge. Standpipes (vertical pipes with P-traps) are common in newer construction and provide excellent drainage.
The maximum drain line length is typically 30 feet, though shorter is always better. Every foot of horizontal run and every elbow fitting adds resistance that the softener’s internal pump must overcome. If your drain exceeds 20 feet or includes multiple turns, consider installing an auxiliary drain pump ($50-$80) to ensure reliable discharge.
Vertical elevation matters significantly. Most softeners can lift brine water up to 8 feet above the unit’s base, but checking your specific model’s specifications is essential. Installing the drain line above this limit causes regeneration failure—the softener tries to discharge, can’t overcome the height, and leaves you with hard water. For basement installations where the drain is above the softener, this frequently causes problems.
The air gap is mandatory in most plumbing codes and prevents contamination of your softener. Maintain at least 1.5 inches between the drain hose end and the flood rim of the drain. This gap means dirty drain water can never siphon back into your clean water system, even during pressure fluctuations. Some DIYers think this requirement is “optional”—it absolutely isn’t.
Understanding Water Hardness: The Science Behind Your Installation
Before installing any water softener, understanding what you’re treating helps tremendously. Water hardness refers to dissolved minerals—primarily calcium and magnesium—that water picks up as it moves through soil and rock. The World Health Organization notes that while hard water isn’t a health hazard, it causes significant practical problems in households.
When hard water is heated in your water heater or pipes, calcium carbonate precipitates out and forms scale deposits. This scale reduces heating efficiency by creating an insulating layer between the heating element and water. Studies show that just 1/8 inch of scale can increase energy consumption by 20-30%. Over time, these deposits clog pipes, reduce water flow, and damage appliances.
The soap scum phenomenon occurs because calcium and magnesium ions react with soap to form insoluble compounds. This is why you need more soap in hard water areas, and why your hands feel “squeaky” rather than truly clean after washing. Soft water allows soap to lather properly and rinse away completely, leaving skin feeling genuinely clean and soft.
Regional variation in water hardness is dramatic across the United States. The Southwest, Great Plains, and Rocky Mountain regions typically have extremely hard water (over 180 mg/L), while the Pacific Northwest and New England tend toward softer water. Your specific hardness depends on local geology—areas with limestone bedrock produce harder water as groundwater dissolves calcium carbonate.
Testing your water before installation isn’t optional if you want proper results. Simple test strips cost $10-$15 and give reasonably accurate readings. For well water, consider a comprehensive laboratory analysis ($30-$100) that tests for hardness, iron, manganese, pH, and other parameters. This information guides your softener selection and programming for optimal performance.
✨ Don’t Miss These Exclusive Deals!
🔍 Take your water quality to the next level with these carefully selected products. Click on any highlighted item to check current pricing and availability. These tools will help you create authentic soft water your family will love!
Water Quality Certification: What NSF Ratings Really Mean
When shopping for water softeners, you’ll encounter various certification claims. The most important comes from NSF International, an independent organization that tests and certifies water treatment products. Understanding these certifications helps you separate legitimate products from marketing hype.
NSF/ANSI Standard 44 specifically covers residential cation exchange water softeners. Products certified to this standard have been tested to verify they reduce hardness as claimed, operate reliably, and don’t introduce harmful contaminants into your water. The Whirlpool WHES40E and several other systems we’ve discussed carry this certification, providing confidence in their performance claims.
NSF/ANSI Standard 61 addresses drinking water system components, ensuring materials used don’t leach harmful substances into your water supply. Look for this certification particularly if you’ll be drinking softened water (though many people prefer unsoftened water for drinking due to the sodium content in salt-softened water).
The Water Quality Association (WQA) also certifies water treatment products through its Gold Seal program. While not as widely recognized as NSF, WQA certification demonstrates a manufacturer’s commitment to quality and performance standards. Some smaller manufacturers pursue WQA certification rather than the more expensive NSF process.
Beware of vague certification claims like “tested to NSF standards” without actual NSF certification. Testing to a standard isn’t the same as being certified—anyone can claim they tested their product. Look for the actual NSF or WQA mark on the product or packaging, and verify certification on the organization’s website if you’re uncertain.
❓ Frequently Asked Questions
❓ Can I install a water softener without any plumbing experience?
❓ How long does DIY water softener installation actually take?
❓ Do I need special tools to install a water softener myself?
❓ What's the difference between bypass valve and shutoff valve?
❓ Can I install water softener in garage or outdoor location?
Conclusion
Installing the easiest water softener to install yourself is absolutely achievable, even if you’ve never tackled a plumbing project before. Electronic descalers like the iSpring ED2000 and Yarna offer genuinely simple 15-minute installations with zero plumbing modifications. For those wanting true water softening, the Whirlpool WHES40E delivers professional results in 30 minutes with its pre-assembled design and straightforward instructions.
The key to successful DIY water softener installation is matching the system to your skill level and home’s specific requirements. Test your water hardness first, measure your available space, and verify drain access before purchasing. Pre-plumbed system options consistently provide the best experience for first-time installers, while experienced DIYers might appreciate the customization and cost savings of assembly-required models like the Fleck 5600SXT.
Remember that proper bypass valve installation and drain line setup are critical details that prevent future problems. Taking an extra 20 minutes to verify correct installation now saves hours of troubleshooting later. The plumbing connection requirements are straightforward when you have the right fittings—don’t hesitate to ask hardware store staff for help selecting compatible parts.
Your investment in a self install water softener system pays dividends immediately through softer skin, longer-lasting appliances, and lower energy bills. The scale deposits from hard water reduce water heater efficiency by 25-40% and shorten appliance lifespans, making this one of the smartest home improvements you can make. Whether you choose a premium system like SpringWell SS or budget-friendly Aquasure Harmony, you’re taking control of your home’s water quality while saving hundreds on professional installation.
Start your project this weekend—your hair, skin, and dishwasher will thank you.
Recommended for You
- Water Softener Capacity Calculator 2026: Size It Right
- Water Softener Buying Guide 2026: 7 Best Systems Tested
- 7 Best 64000 Grain Water Softener Systems – 2026
Disclaimer: This article contains affiliate links. If you purchase products through these links, we may earn a small commission at no additional cost to you.
✨ Found this helpful? Share it with your friends! 💬🤗